
Ever stared at a photo and wondered where it really came from? Or tried to find a higher-resolution version of an image you saved months ago? That’s where Image Search Techniques come in. They let you search the web using a picture instead of a sentence, and once you know how they work.
There are two main approaches at play here. One relies on text and metadata attached to a picture. The other, called content-based image retrieval, uses AI and computer vision to study the actual pixels. Understanding both gives you a full toolkit for tracking, verifying, and optimizing images online.
This guide walks through reverse image search, the best tools for different jobs, advanced input tricks, and how to make your own images easier to find. By the end, you’ll know exactly which method fits your situation.
What Are Image Search Techniques?
Image Search Techniques fall into two broad categories, and knowing the difference changes how you approach a search. The first is text-based metadata querying. This method reads the words attached to an image — file names, captions, alt text, and surrounding page content — and matches them against your typed query. It’s fast, familiar, and works well when images are properly labeled.
The second category is content-based image retrieval, or CBIR. Instead of reading text, CBIR analyzes the visual features of the picture itself: shapes, colors, textures, and object patterns. Modern search engines use machine learning models trained on millions of images to recognize what’s actually in a photo, even if no one ever typed a description of it.
Text-Based Metadata Search
This is the traditional method most people already use without thinking about it. You type “golden retriever puppy” into Google Images, and the engine pulls results based on file names, alt attributes, and page context. It works well, but it depends entirely on how well the original image was labeled.
Content-Based Image Retrieval (CBIR)
CBIR flips the process. You feed the engine a picture, and it studies the pixels directly. This is the technology behind reverse image search, facial recognition matching, and product identification tools. It doesn’t care what the file is named it cares what the image actually shows.
How to Do a Reverse Image Search
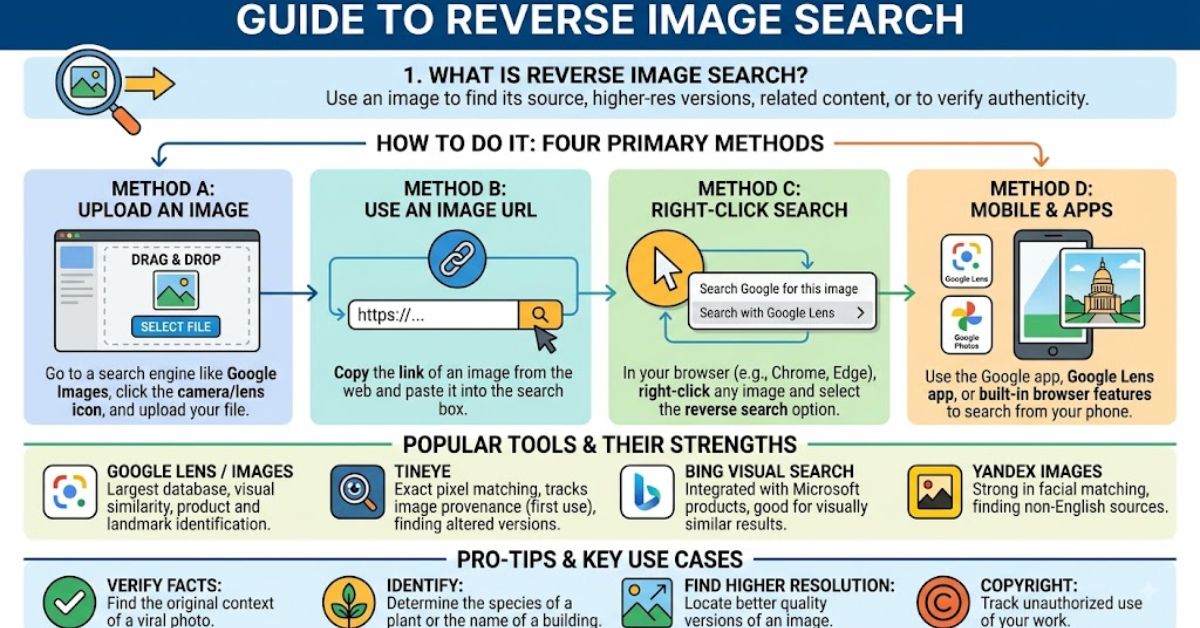
Reverse image search lets you upload or link a picture instead of typing keywords, and the engine returns visually similar or identical matches from across the web. It’s one of the most useful Image Search Techniques for verifying photo authenticity, finding a product, or tracking down the original source of a viral image.
There are three common ways to run this kind of search, and each fits a different situation depending on where your image file is sitting.
- File Upload – Pull a raw image straight from your local storage into a search portal like Google Images or TinEye.
- URL Pasting – Copy the direct web address of an online picture to trace where it first appeared.
- Drag-and-Drop – Drag an image straight from a browser tab or folder into a compatible search engine window.
File Upload Method
This is the go-to option when the image lives on your device. Most engines have a camera icon or “upload” button right in the search bar. It’s ideal for screenshots you’ve saved, product photos from a shoot, or images pulled from a messaging app.
URL Pasting Method
If the image is already online, grab its direct address and paste it into the search field. This skips the download step entirely and works especially well for tracing images shared on social media or news sites back to their origin.
Drag-and-Drop Method
Many browsers now support dragging an image directly from one tab into a search engine’s query box. It’s the fastest method when you’re already looking at the picture and don’t want to save or copy anything first.
Best Image Search Engines and When to Use Them
Not every search engine indexes the same slice of the internet, so cross-referencing across platforms gives you the most complete picture. Choosing the right one depends on what you’re actually trying to accomplish.
| Engine | Best For | Notable Strength |
|---|---|---|
| Google Images | General, broad discovery | Largest overall index |
| TinEye | Tracing origins, spotting duplicates | Historical accuracy and edit tracking |
| Yandex Images | Facial matches, regional results | Strong facial recognition |
| Bing Visual Search | Shopping, product identification | E-commerce integration |
Google Images remains the default starting point for most casual searches because of its sheer index size. But if you need to know exactly when and where an image first appeared online, TinEye is built specifically for that job — it excels at spotting copyrighted edits and duplicate uploads.
Yandex Images has earned a reputation for stronger facial recognition results, which makes it a common pick when other tools come up empty on a portrait or headshot. Bing Visual Search, meanwhile, leans into shopping — it’s the engine to try when you’re trying to identify a product or find where to buy something you saw in a photo.
Advanced Techniques to Sharpen Your Results
The way you prepare an image before searching has a direct impact on accuracy. A cluttered or compressed photo confuses the underlying model, while a clean, focused input gives it far less to sort through.
- Crop tightly around the specific object you care about, not the whole scene.
- Use the original file instead of a screenshot whenever possible.
- Pair your image with a few descriptive words to narrow massive result sets.
Cropping for Precision
If you only care about a chair leg or a logo in the corner of a photo, crop the image down to that exact section before uploading. Removing the busy background gives the algorithm one clear subject to match instead of forcing it to guess which element matters.
Skip the Screenshot
Screenshots compress and re-encode an image, which softens edges and strips out visual detail the model relies on. Whenever you have access to the original file, upload that instead. You’ll notice measurably better match accuracy, especially with smaller or lower-contrast images.
Hybrid (Multimodal) Search
Some engines let you combine an uploaded image with a short text description, a method known as multimodal search. Uploading a photo of a jacket and adding “men’s navy wool coat” filters an enormous set of visual matches down to a handful of relevant, specific results.
Optimizing Your Own Images for Search
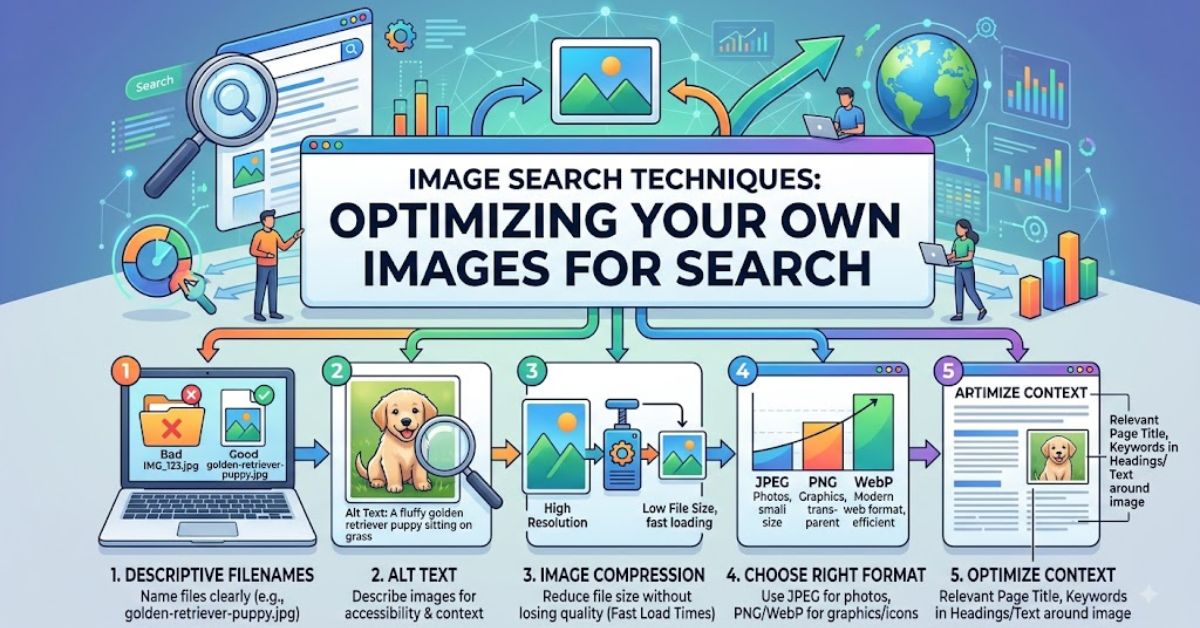
If your goal shifts from finding images to making your own content findable, the strategy changes. Now you’re speaking directly to search crawlers, and that means focusing on descriptive, structured metadata rather than visual matching.
Search engines can’t fully “see” an image the way a person can, so they lean heavily on the text data surrounding it. Getting this right is one of the simplest, highest-leverage image SEO wins available.
- Rename files with descriptive, keyword-relevant phrases.
- Write alt text that explains the image clearly and naturally.
- Add schema markup for pricing, availability, and licensing where relevant.
Descriptive File Names
A file named IMG_1042.jpg tells a search engine nothing. Renaming it to navy-blue-canvas-backpack.jpg immediately gives crawlers context about what the picture contains, which helps it surface in relevant searches.
Writing Effective Alt Text
Alt text serves two audiences at once: search crawlers and screen reader users. Good alt text is specific and concise, describing what’s actually in the image without stuffing in unrelated keywords. “Navy blue canvas backpack with leather straps on wooden table” beats a vague “backpack image” every time.
Image Schema Markup
Structured data tags let you tell search engines specific facts about an image — its price, availability, or creator rights — in a format machines can parse instantly. For e-commerce sites especially, this markup can be the difference between a plain listing and a rich result with visible pricing in search.
Common Mistakes to Avoid
Quick checklist before you publish or search:
- Don’t rely on a single search engine for verification cross-check at least two.
- Don’t upload heavily compressed screenshots when the original file is available.
- Don’t leave default file names like
IMG_001.jpgon published images. - Don’t write alt text that’s either empty or keyword-stuffed.
- Don’t skip cropping when the subject is a small part of a larger photo.
Conclusion
Image Search Techniques break down into two clear paths: text-based metadata search, which reads labels and captions, and content-based image retrieval, which studies the image itself using AI. Knowing when to reach for reverse image search, which engine fits your task, and how to refine your input all make a measurable difference in result quality.
On the flip side, optimizing your own images through clear file names, useful alt text, and schema markup ensures your visual content gets discovered too. Whether you’re tracing a photo’s origin or making your product images easier to find, the right Image Search Techniques turn a frustrating guessing game into a fast, reliable process.